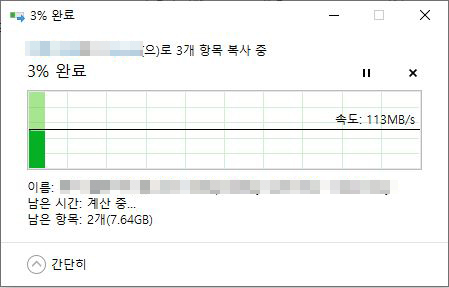
성공적으로 AFP와 SMB를 통한 Mac, Windows와의 공유환경을 구축했다.
그러나 윈도우에서 NAS에 파일을 올려보니 전송속도가 1mb/s밖에 나오지 않는다.
네트워크 설정을 잘못하면 수시로 접속이 끊기기 때문에 이번 설정은 ssh가 아니라 직접 Ubuntu PC에서 작업하자.
ethtool 로 이더넷 상태를 확인.
$ ethtool <네트워크 이름>
Settings for eth0:
        Supported ports: [ TP ]
        Supported link modes:   10baseT/Half 10baseT/Full
                                100baseT/Half 100baseT/Full
        Supported pause frame use: No
        Supports auto-negotiation: Yes
        Supported FEC modes: Not reported
        Advertised link modes:  Not reported
        Advertised pause frame use: No
        Advertised auto-negotiation: Yes
        Advertised FEC modes: Not reported
        Speed: 10Mb/s
        Duplex: Half
        Port: Twisted Pair
        PHYAD: 0
        Transceiver: internal
        Auto-negotiation: on
        MDI-X: Unknown
...
Supported link modes에 지원 가능한 속도와 작동모드가 나온다.
랜카드가 100Mb/s까지밖에 지원을 안한다...
랜카드를 바꾸기 전에 어찌됐든 100Mb/s까지는 속도를 내보자.
$ sudo ethtool -s eth0 speed 100 duplex full autoneg off
speed <속도> : Supported link modes에서 원하는 속도를 적으면 전송 속도(Speed: 00Mb/s)를 바꿀 수 있다.
duplex <모드> : half / full을 입력할 수 있으며, 전송모드(Duplex)를 바꿀 수 있다.
autoneg <상태> : on / off를 입력할 수 있으며, 자동협상모드(Auto-negotiation)을 켜고 끌 수 있다.
<참고>
*Duplex : Half duplex는 한 번에 데이터를 수신 또는 송신 중 한 가지만 할 수 있다. 반면 Full duplex는 동시에 데이터의 송수신이 가능하다.
*Auto-negotiation : 이더넷 장치가 연결된 다른 이더넷 장치와의 환경에 따라 Duplex 모드를 자동으로 결정하게 하는 설정.
https://www.thegeekstuff.com/2010/10/ethtool-command/
9 Linux ethtool Examples to Manipulate Ethernet Card (NIC Card)
9 Linux ethtool Examples to Manipulate Ethernet Card (NIC Card) by Balakrishnan Mariyappan on October 28, 2010 Ethtool utility is used to view and change the ethernet device parameters. 1. List Ethernet Device Properties When you execute ethtool command wi
www.thegeekstuff.com
ethtool로 다시 확인해보면..
$ ethtool eth0
Settings for eth0:
        Supported ports: [ TP ]
        Supported link modes:   10baseT/Half 10baseT/Full
                                100baseT/Half 100baseT/Full
        Supported pause frame use: No
        Supports auto-negotiation: Yes
        Supported FEC modes: Not reported
        Advertised link modes:  Not reported
        Advertised pause frame use: No
        Advertised auto-negotiation: Yes
        Advertised FEC modes: Not reported
        Speed: 10Mb/s
        Duplex: Full
        Port: Twisted Pair
        PHYAD: 0
        Transceiver: internal
        Auto-negotiation: on
        MDI-X: Unknown
도통 제대로 적용이 되질 않는다.
Advertised link modes는 100으로 바뀌지만,
정작 Speed와 Duplex가 Unknown으로 잡히는 경우가 많다.
이렇게 되는 순간 공유기에서 오는 네트워크 신호를 받지 못해 인터넷이 끊겨버린다.
아무리 다시 시도하고, 여러 방법을 찾아봐도 해결이 안된다.
랜카드 드라이버 문제로 생각된다.
이걸 고치느니... 기가비트가 지원되는 랜카드를 구입했다.
그리고 외부 인터넷 회선은 100Mbps으로, 속도가 10Mb/s밖에 나오지 않지만
기가비트 공유기와 랜카드가 있으면 내부 네트워크는 별개로 기가 속도로 쓸 수 있다.
기가비트 공유기까지 구입했다.
이제 내부 네트워크를 기가비트 속도로 잡아보자.
1. 공유기 설정
공유기를 바꿨으니 와이파이는 물론 모든 네트워크 설정을 다시한다.
1) 자작 NAS (2) - 외부에서 접속하기 https://everycommit.tistory.com/2
2) 자작 NAS (3) - 우분투 WOL 기능 https://everycommit.tistory.com/3
2. NAS PC에 랜카드 추가
새로 구입한 랜카드는 ipTime PX1000plus다.
메인보드에 꽂고 부팅 후 하드웨어를 검색해 본다. ($ lshw -c network)
(처음에 메인보드 포트 두 개 중 위 쪽에 꽂아보니 인식을 못해서 아래 쪽에 꽂고 인식까지 성공했다.)
$ lshw -c network
  *-network DISABLED
       description: Ethernet interface
       product: RTL8111/8168/8411 PCI Express Gigabit Ethernet Controller
       vendor: Realtek Semiconductor Co., Ltd.
       ...
       logical name: eth1
       ...
  *-network
       description: Ethernet interface
       product: AR8132 Fast Ethernet
       vendor: Qualcomm Atheros
       ...
       logical name: eth0
       ...
위 쪽 network device가 새로 추가한 랜카드고, 아래 쪽이 메인보드 랜카드다.
각각의 logical name을 잘 기억해두자.
다음 명령으로 DISABLED된 eth1을 활성화 시키고, eth0을 비활성화 시킨다.
$ sudo ifconfig eth1 up
$ sudo ifconfig eth0 down
다시 확인해보자
$ lshw -c network
  *-network
       description: Ethernet interface
       product: RTL8111/8168/8411 PCI Express Gigabit Ethernet Controller
       vendor: Realtek Semiconductor Co., Ltd.
       ...
       logical name: eth1
       ...
  *-network DISABLED
       description: Ethernet interface
       product: AR8132 Fast Ethernet
       vendor: Qualcomm Atheros
       ...
       logical name: eth0
       ...
이제 여기서 ifconfig로 네트워크 상태를 확인해보면
$ ifconfig
eth1: flags=4163<UP,BROADCAST,RUNNING,MULTICAST>  mtu 1500
        inet6 14ff::1ca:13cc:aa11:3931  prefixlen 64  scopeid 0x20<link>
        ether 12:34:56:78:11:22  txqueuelen 1000  (Ethernet)
        RX packets 2221  bytes 467123 (467.1 KB)
        RX errors 0  dropped 0  overruns 0  frame 0
        TX packets 273  bytes 45451 (45.4 KB)
        TX errors 0  dropped 0 overruns 0  carrier 0  collisions 0
잘 나오는 것 같으나 inet 정보가 나오지 않는다.

고급설정 - 네트워크 관리 - 내부 네트워크 설정에서도 연결된 PC의 IP 주소를 찾을 수 없다.
/etc/netplan/50-cloud-init.yaml를 수정해야 한다.
network:
    ethernets:
        renderer: networkd
        eth0:
            dhcp4: true
            wakeonlan: true
    version: 2
eth0을 추가한 랜카드의 logical name으로 수정한다.
수정한 내용을 적용시켜준다.
$ sudo netplan apply
ifconfig로 확인해보면 inet 부분에 할당된 내부 네트워크 IP를 찾을 수 있다.
$ ifconfig
eth1: flags=4163<UP,BROADCAST,RUNNING,MULTICAST>  mtu 1500
        inet 192.168.0.xx  netmask 255.255.255.0  broadcast 192.168.0.255
        inet6 14ff::1ca:13cc:aa11:3931  prefixlen 64  scopeid 0x20<link>
        ether 12:34:56:78:11:22  txqueuelen 1000  (Ethernet)
        RX packets 2626  bytes 543210 (543.2 KB)
        RX errors 0  dropped 0  overruns 0  frame 0
        TX packets 389  bytes 67548 (67.5 KB)
        TX errors 0  dropped 0 overruns 0  carrier 0  collisions 0
3. 이더넷 기가비트 설정
$ ethtool eth1로 찍어보면, 기가비트 랜카드라 설정 가능한 속도가 10baseT, 100baseT, 1000baseT로 모두 나온다.
$ ethtool eth1
Settings for eth1:
	Supported ports: [ TP MII ]
	Supported link modes:   10baseT/Half 10baseT/Full
	                        100baseT/Half 100baseT/Full
	                        1000baseT/Half 1000baseT/Full
	Supported pause frame use: No
	Supports auto-negotiation: Yes
	Supported FEC modes: Not reported
	Advertised link modes:  10baseT/Half 10baseT/Full
	                        100baseT/Half 100baseT/Full
	                        1000baseT/Half 1000baseT/Full
	Advertised pause frame use: Symmetric Receive-only
	Advertised auto-negotiation: Yes
	Advertised FEC modes: Not reported
	Link partner advertised link modes:  10baseT/Half 10baseT/Full
	                                     100baseT/Half 100baseT/Full
	                                     1000baseT/Full
	Link partner advertised pause frame use: Symmetric
	Link partner advertised auto-negotiation: Yes
	Link partner advertised FEC modes: Not reported
	Speed: 1000Mb/s
	Duplex: Full
	Port: MII
	PHYAD: 0
	Transceiver: internal
	Auto-negotiation: on
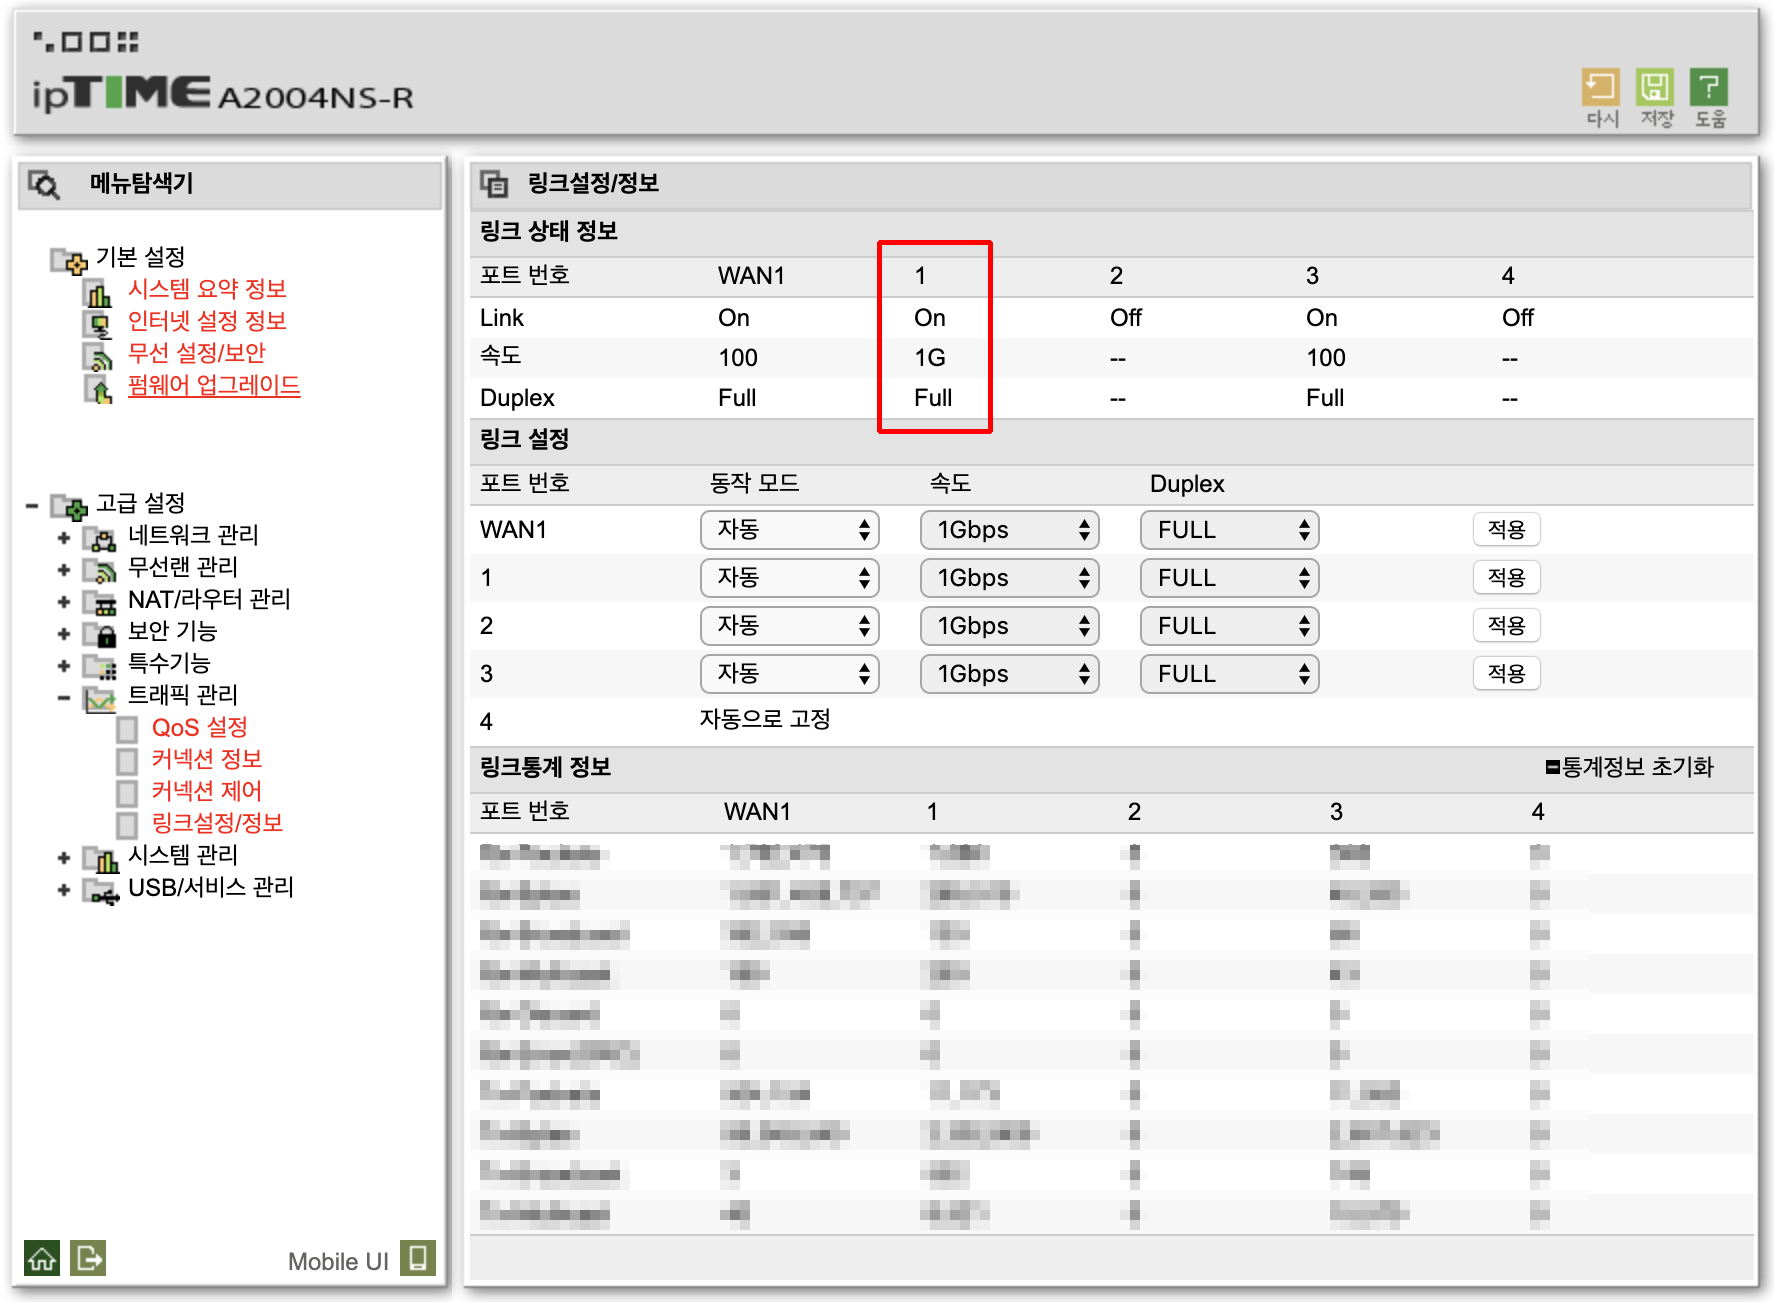
Speed가 1000Mb/s로 되어 있다면 ipTime에서도 포트 속도가 제대로 나온다.
고급설정 - 트래픽 관리 - 링크설정/정보에서 확인할 수 있다.

다시 이더넷 설정을 해보자.
$ sudo ethtool -s eth1 speed 1000 duplex full autoneg off
Cannot set new settings: Invalid argument
  not setting speed
  not setting duplex
  not setting autoneg
아무리 시도해봐도 도저히 명령어가 들어먹질 않는다.
검색해보니 IEEE 802.3-2002 표준에 따라 1000baseT에서는 autonegotiation을 off할 수 없다고 한다.
그런데 ethtool 정보 중 아래와 같은 내용이 있다.
Link partner advertised link modes:  10baseT/Half 10baseT/Full
	                                     100baseT/Half 100baseT/Full
	                                     1000baseT/Full
연결된 파트너가 지원하는 속도를 말하는 것 같다.
다시 공유기 설정에 들어가서 고급설정 - 트래픽 관리 - 링크설정/정보을
연결된 포트의 속도를 수동으로 조절할 수 있다.

이걸 수동으로 바꾸고 속도 : 1Gbps, Duplex : Full로 적용해보자.
$ ethtool eth1로 다시 확인해보면
Link parter advertised link modes에 1000baseT만 나온다.
$ sudo ethtool eth1
Settings for eth1:
    ...
	Link partner advertised link modes:  1000baseT/Full
    ...
    Speed: 1000Mb/s
    Duplex: Full
    ...
    Auto-negotiation: on
예상컨데, Auto-negotiation이 작동하더라도 고정된 공유기 설정을 따라가지 않을까 싶다.
이제 속도가 잘 나온다!

Wifi로 접속한 맥에서도 속도가 어느 정도 받쳐준다.

공유기는 ipTime A2004NS-R이고, 제품설명에 따르면 5Ghz에서 867Mbps까지 나온다고 하니
50Mb/s만 넘어가도 만족할 만한 수준이다.
'NAS' 카테고리의 다른 글
| 자작 NAS - 웹하드 구축하기 (ownCloud) (0) | 2020.02.02 |
|---|---|
| 자작 NAS (6) - 내부 파일 공유 환경 구축 2(Ubuntu - Windows SMB) (0) | 2020.01.26 |
| 자작 NAS (5) - 우분투 논리볼륨 추가하기 (0) | 2020.01.26 |